HOW TO CUSTOMISE NAVBAR IN BLOGGER LIKE A PRO
Follow these steps below to make changes in your navbar.
1. ADJUSTING ELEMENT IN NAVBAR
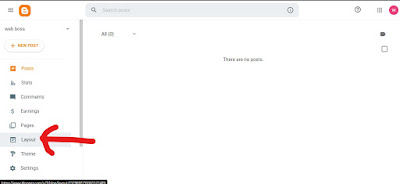
Step:1 Open the layout section in the blogger's dashboard
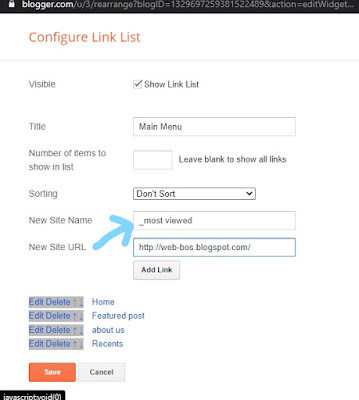
Step:2 look for main menu option in layout section
NOTE- there can be a difference in the main menu name it can be nav menu, or navbar etc.so choose accordingly
Step:5 If you want to show one of your element after other
Step:6 Then just click on the down arrow show here. to adjust their position after that element.
Step:7 If you want to show the element before any other element then just click on up arrow and adjust their position above that element.
Step:8 After your satisfaction with the menu click on the save button under all the elements to save your changes
And you click on "view blog" to see the changes.
2. MAKING SUBMENU OR SUB SUBMENU
For making sub menu follow these steps
Step:1 Click on the edit button of the element to which you want to shown under sub menu.
Step:2 To make it a submenu then just add this "-" before the elements name without giving space between them.
Step:3 And adjust this element under that element under which you want show that element. as you learned before in the above article.
And click on save to save the changes
For making sub submenu
Step:4 Just add this "--" before the element's name without space to which you want to make a sub submenu
And click on save to to save the changes
And now your navbar is ready to use
Learn how to set up Gmail account
See our full course on how to make a website from scratch


0 Comments
Give us a feedback